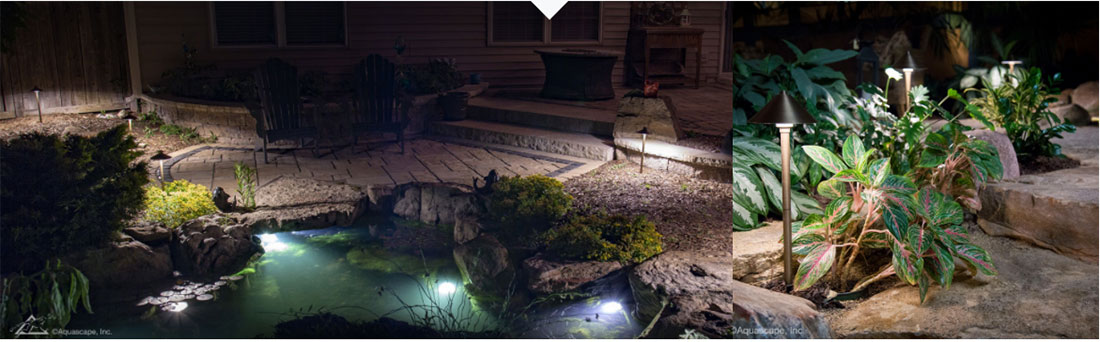
If you would like to brighten up your yard or pond with some low voltage lighting and extend the time you can enjoy your property, LED lights really are the best choice. Not only are LED lights more energy efficient than traditional low voltage halogen lights, the LED lights last many times longer, produce less heat and are simple to install. If you are looking to add more than just a single light fixture to your yard, then designing your own custom LED system is the way to go. It may seem daunting at first, but it is really quite simple.
Determine what areas of your yard you would like to illuminate. You may just want to brighten up a small space around a bench or seating area, or you may have many different features or focal points in your yard that you want to enhance.
Don’t worry if you are not sure exactly how many lights you want, you can always add to your system at a later date.
Here are some examples of how you can create real drama in your yard with lighting.
Once you have decided how many lights you will be using, you’ll need to choose a transformer large enough to provide power to all of your lights. This is simply a matter of adding up the wattage of all your lights you have chosen. Many LED lights are 1 watt, but there are also larger, brighter lights that are 3 or 6 watts or more. Simply add up the wattage of the individual lights you have chosen and take note of the total. Then choose a transformer that capable of handling that wattage.
It is also a good idea to choose a transformer that handles 10% more the total wattage of the lights you are using. This is to compensate for possible fluctuations in wattage. Aquascape transformers only consume the necessary wattage to power your lighting, so using a transformer with extra voltage will provide extra power if additional lights are added in the future without consuming extra electricity.
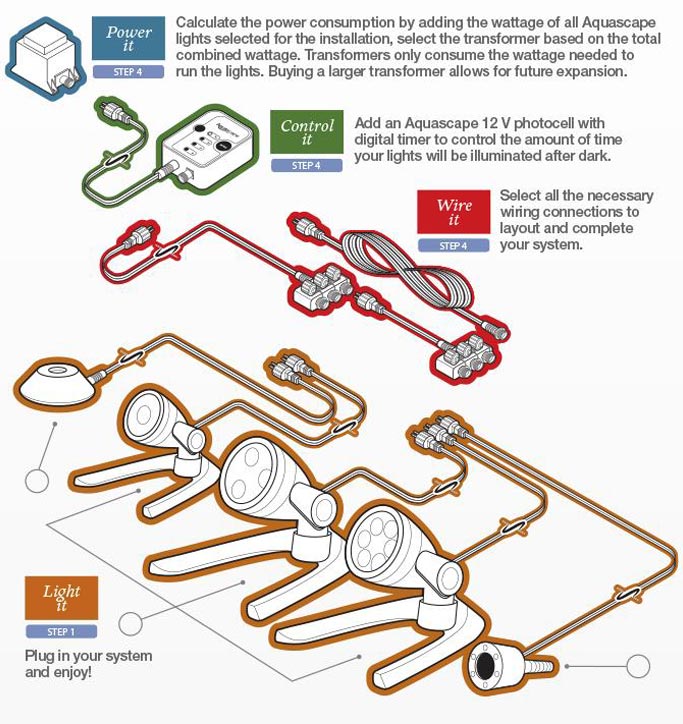
Many of our lights come with 15’ power cords which is more than adequate in most cases. However if you want to run a light more than 15’ from the transformer, 25’ LED extension cables can be easily plugged in between the light and the transformer.
Most transformers come with 1 outlet, no problem if you only want 1 light. If you want to use more lights, simply pick the appropriate splitter. 3 Way and 6 Way splitters are available to run systems with multiple lights. If you have more than 6 lights you can 2 or more splitters to provide enough outlets.
Photocells are popular accessories because they atomically turn lights on when they are needed. Photocells turn lights on at dusk and turn them off at dawn, save electricity and also extending the life of the bulbs.
All our LED lights and accessories come with simple quick connectors that make installation simple and easy. We recommend hiding the power cables under mulch or run them along the edge of the pond to conceal the cords. Then if you need to access the lights or add more to the system everything is easy to get at.